MRS. DOPICO'S ART CLASS
  • Home
  • Class Procedures/Policy
  • Studio Art
    • Zentangle Landscape
    • Observation Still Life Drawing- Vanitas
    • Perspective- Street Corner
    • Sneaker Design
    • Audubon Bird Collages
    • Achromatic Painting
    • Color Wheel Eye
    • Monochromatic Landscape
    • Picasso Portrait
    • Tessellation
    • Final- Portfolio
  • Foundation in Media Arts
    • Personal Collage
    • Object Portrait
    • Line Tile Paintings
    • Abstract Collage
    • Value Landscapes
    • Pen Tool
    • CharacterSelfie
    • Product Design- Sneakers
    • Perspective City
    • Color Theory
    • Koi Fish Illustration
    • Low Poly Portrait
    • Digital Painting- Galaxy
    • Digital Painting- Study
    • Final Project FIMA
  • Make Up Projects (OSS/ISS)
  • Mrs. Dopico's Artwork

Perspective City


Perspective in the Workplace

Architects, interior designers, landscapers etc all use perspective drawings in their jobs. Perspective is used a communication tool between themselves and the client that hired them. Creating these drawings using accurate perspective allows them to give their clients a better idea of what the project will look like when it is complete. 

Linear Perspective

Perspective
in art is a drawing technique used to create an illusion of a 3 dimensional space on a 2 dimensional surface (the paper, or computer screen in our case).
Perspective is what is used in a painting to give it dimension, form, a sense of distance and a feeling of it being "real". The rules of perspective apply to ALL subjects from portraits to landscapes. 

In Western art linear perspective was created in the 15th century. Prior to that, artwork that depicted space tended to look kind of topsy turvy and not quite right. The Renaissance artist Leon Battista Alberti and architect Filippo Brunelleschi are credited with the "invention" of linear perspective. We still use their vanishing point system today! 

In a perspective drawing there are a few things you will find. First is a vanishing point (or 2). This is the point in the work that each line and shape recedes back to. The vanishing point is the most important part of drawing properly in perspective.

Next is a horizon line. This is a straight line across the entire piece that separates the sky from the ground. By adding a horizon line, the viewer can tell what is the sky and what is the ground allowing the buildings to look real. If the object or building is taller than the horizon line it slopes down towards the vanishing point, and if it is shorter than the horizon line it slopes upwards towards the vanishing points. 

Modern Perspective
With the invention of computer based art, we have developed an easier and faster way to create artwork in perspective using Adobe Illustrators, Perspective Grid tool. It automatically creates the 2 point linear perspective grid that allows us to create buildings and objects with straight lines in perspective. You can easily adjust the viewpoint to be centered, high or low depending on what you are trying to achieve with your drawing. 
​

Assignment # 1- Perspective Intro Questions
  • google doc on google classroom

​

Picture
Assignment # 3: Reflection Questions
When you are done with your project, and it is in your google portfolio for grading, answer the following questions in the comment section underneath your slide:
  1. What do you think you did well in this project?
  2. What do you think you could improve on in this project?
  3. What did you learn how to do, or get better at doing in this project?
  4. What scene did you create? What is the story behind your cityscape?
Assignment #2:
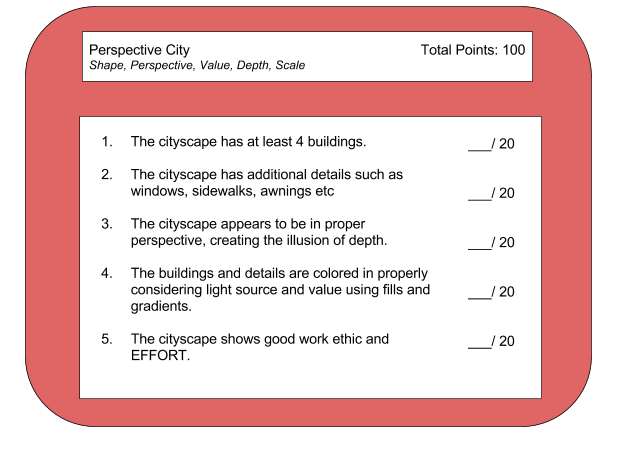
​Perspective City Street Corner


You are to create a cityscape in 2 point perspective using the Perspective Grid tool in Adobe Illustrator. It must include the following:
  1. It must have at least 4 buildings. 
  2. It must have windows and additional details to your city! This can include doors, awnings, window ledges, a sidewalk etc. 
  3. All objects and shapes MUST be in the proper perspective!
  4. It must be accurately colored in using value considering the light source! Fills and gradients.
  5. It must have additional details to set the scene. This includes clouds. street signs, a sun/ moon etc. 
  6. Feel free to copy and paste your completed cityscape into Photoshop to add an overlay. (Not a requirement but I feel like it could possibly jazz it up)
  7. It must show good work ethic and EFFORT!
Tutorial Below:
perspectivecity.pdf
File Size: 5481 kb
File Type: pdf
Download File

Picture
Proudly powered by Weebly
  • Home
  • Class Procedures/Policy
  • Studio Art
    • Zentangle Landscape
    • Observation Still Life Drawing- Vanitas
    • Perspective- Street Corner
    • Sneaker Design
    • Audubon Bird Collages
    • Achromatic Painting
    • Color Wheel Eye
    • Monochromatic Landscape
    • Picasso Portrait
    • Tessellation
    • Final- Portfolio
  • Foundation in Media Arts
    • Personal Collage
    • Object Portrait
    • Line Tile Paintings
    • Abstract Collage
    • Value Landscapes
    • Pen Tool
    • CharacterSelfie
    • Product Design- Sneakers
    • Perspective City
    • Color Theory
    • Koi Fish Illustration
    • Low Poly Portrait
    • Digital Painting- Galaxy
    • Digital Painting- Study
    • Final Project FIMA
  • Make Up Projects (OSS/ISS)
  • Mrs. Dopico's Artwork